
StackGres 1.0.0: Open Source Postgres-aaS with 120+ Extensions
TL;DR
We’re announcing StackGres 1.0.0 GA. StackGres is an Open Source Postgres-as-a-Service that runs on any Kubernetes environment. StackGres, today, is the Postgres platform with the most Postgres extensions available: 120 as of today. Many more to come in the future.
Why Kubernetes?
At OnGres we have been providing Postgres Professional Services for years. We love IaC (Infrastructure as Code). One of our realizations was that it was next to impossible to create a “single IaC package” that would contain Postgres and its Stack of components, that would work on any environment. There are just so many different compute, storage and networking components, with different APIs.
So we asked ourselves: is there any “abstraction layer” for distributed infrastructure? The answer was Kubernetes. Kubernetes APIs allowed us to create a single deployable Postgres package, that contains Postgres itself and all its necessary Stack, and run –almost– anywhere.
StackGres, a feature-rich Postgres Platform
StackGres contains the full Stack of Postgres components needed for production:
High availability and automated failover, using Patroni. Managed DNS endpoints for the primary (rw) and replicas (ro, load balanced) connections.
Built-in, enabled by default connection-pooling.
Configurable automated backups with retention policies.
Prometheus metrics exporter, with auto-binding. Customized Postgres metrics, Grafana dashboards and Postgres alerts.
Expertly tuned default configurations –which you can optionally override.
StackGres: innovating the Postgres Platform
So far, the features mentioned may be “table stakes” as of today. We wanted to provide more. StackGres has introduced significant innovations –while keeping the same Postgres core boring– such as:
Using Envoy to proxy all Postgres traffic. In collaboration with the Envoy Community, we developed the Postgres filter for Envoy. StackGres uses it to add additional monitoring (by inspecting the wire protocol) and to terminate SSL!
A fully-featured Web Console. It supports everything StackGres can do. And yes, it has a dark mode ;)
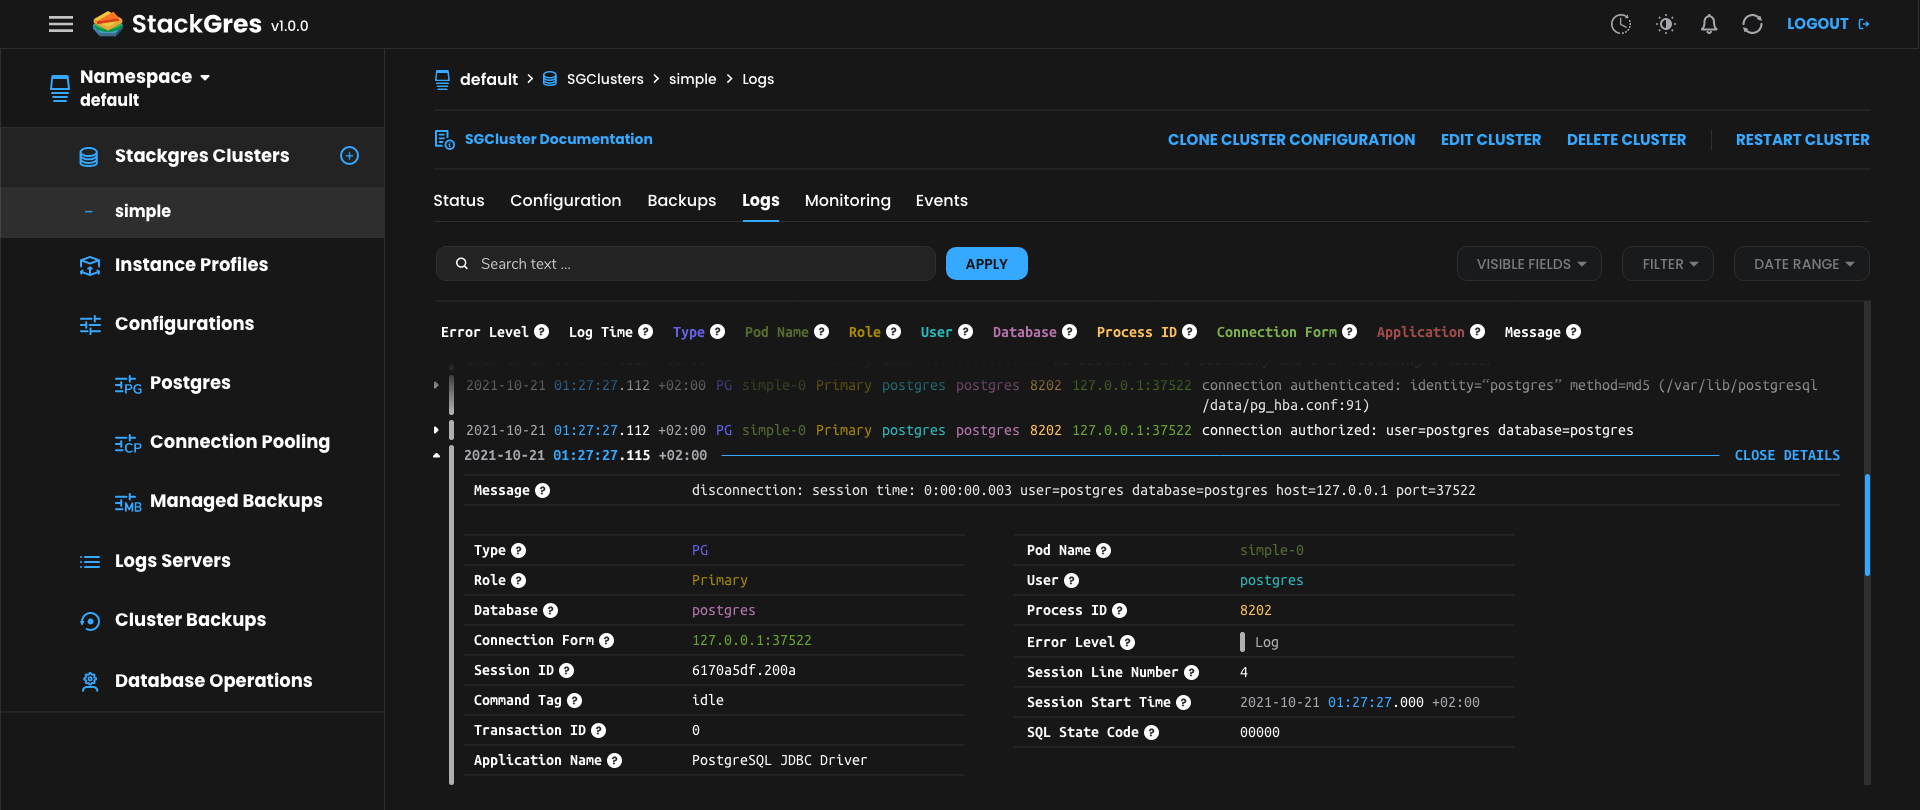
A system to push all Postgres and Patroni logs from all pods to a central server. This central server is a separate, StackGres-managed Postgres database with Timescale to support large volume and high velocity logging. Query your logs with SQL or from the Web Console!
Fully automated “Day 2” DBA operations, including: minor and major version upgrades, controlled cluster restart, container version upgrades, vacuum, repack and even benchmarks!
A system to dynamically load Postgres extensions into the containers. This allows us to ship lighter containers, while supporting potentially hundreds of extensions –120 as of now, with many more to come in the future.
Easy of installation and use
Production Postgres requires a fair amount of Postgres expertise. One of our goals is to “democratize production Postgres”, and make it accessible to almost anyone. StackGres is designed to be easy to operate.
Visit StackGres Installation page for a quick primer on how to install StackGres either
via kubectl or Helm (Helm Chart also published to
ArtifactHub, please star it!).
There is more detailed information in the Production Installation section of
the documentation.
For this post we will use Helm installation. Add the StackGres Helm repository:
helm repo add stackgres-charts https://stackgres.io/downloads/stackgres-k8s/stackgres/helm/
And install with Helm into a dedicated namespace:
helm install --namespace stackgres --create-namespace \
    stackgres stackgres-charts/stackgres-operator
The above command will normally take 0-2 minutes. Now let’s create our first cluster. If you prefer to do it all from
the Web Console, skip to the next section. Create a simple YAML file named demo.yamlwith the following content:
apiVersion: stackgres.io/v1
kind: SGCluster
metadata:
  name: sgdemo
spec:
  postgres:
    version: 'latest'
  instances: 1
  pods:
    persistentVolume:
      size: '5Gi'
Then kubectl apply the file:
kubectl apply -f demo.yaml
The easiest way to connect is to run psql within the postgres-util container, an administration container that is
always started with your StackGres pods:
kubectl exec -it sgdemo-0 -c postgres-util -- psql
You may also connect from any other pod within the cluster. Note that the default username is postgres and the
password is randomly generated and written in a secret named as the cluster, with the key superuser-password.
Adding an extension!
StackGres supports as of today more than 120 extensions, with many more to come in the future.
As mentioned, StackGres loads extensions dynamiycally. This means that save a few that are required for internal
operation, your cluster will contain by default no other extension. You can check by running the select * from pg_available_extensions query from within psql. This is good! Containers are lighter and are exposed to fewer
potential security problems.
But now let’s say you want to use your favorite extension, for example citext. This is a very useful extension to deal
with text in a case insensitive manner. To add this extension to the live container, you just need to edit the
.spec.postgres section of the SGCluster as in:
...
spec:
  postgres:
    version: 'latest'
    extensions:
      - name: 'citext'
...
(you can either edit the original YAML file and then do kubectl apply -f demo.yaml or directly via kubectl edit sgcluster demo)
In a few seconds, the extension will be available!. You may also do it from the Web Console by editing the
cluster and selecting the extension(s) that you want to lead from the Web Console. Now, to use the extension, you just
need to run in psql, as with any Postgres extension:
create extension citext;
To release the resources, simply run kubectl delete -f demo.yaml.
Using the Web Console
As mentioned, StackGres comes with a fully-featured Web Console. Let’s check it out. Let’s identify the pod name where the Web Console is running and do a port-forward to expose it in our laptop:
WEBC=`kubectl --namespace stackgres get pods -l "app=stackgres-restapi" -o jsonpath="{.items[0].metadata.name}"`
kubectl --namespace stackgres port-forward "$WEBC" 8443:9443
For production usage, it is recommended to use a
LoadBalanceras part of the installation Helm parameters or setup anIngresscontroller. Check the Installation via Helm section of the documentation for more information.
Open in your web browser the address https://localhost:8443/. You will see a warning (expected,
the certificate is self-signed, you may also bring your own with
custom Helm parameters). The
default username is admin. The password is generated randomly and can be queried with the following command:
kubectl -n stackgres get secret stackgres-restapi --template '{{ printf "%s\n" (.data.clearPassword | base64decode) }}'
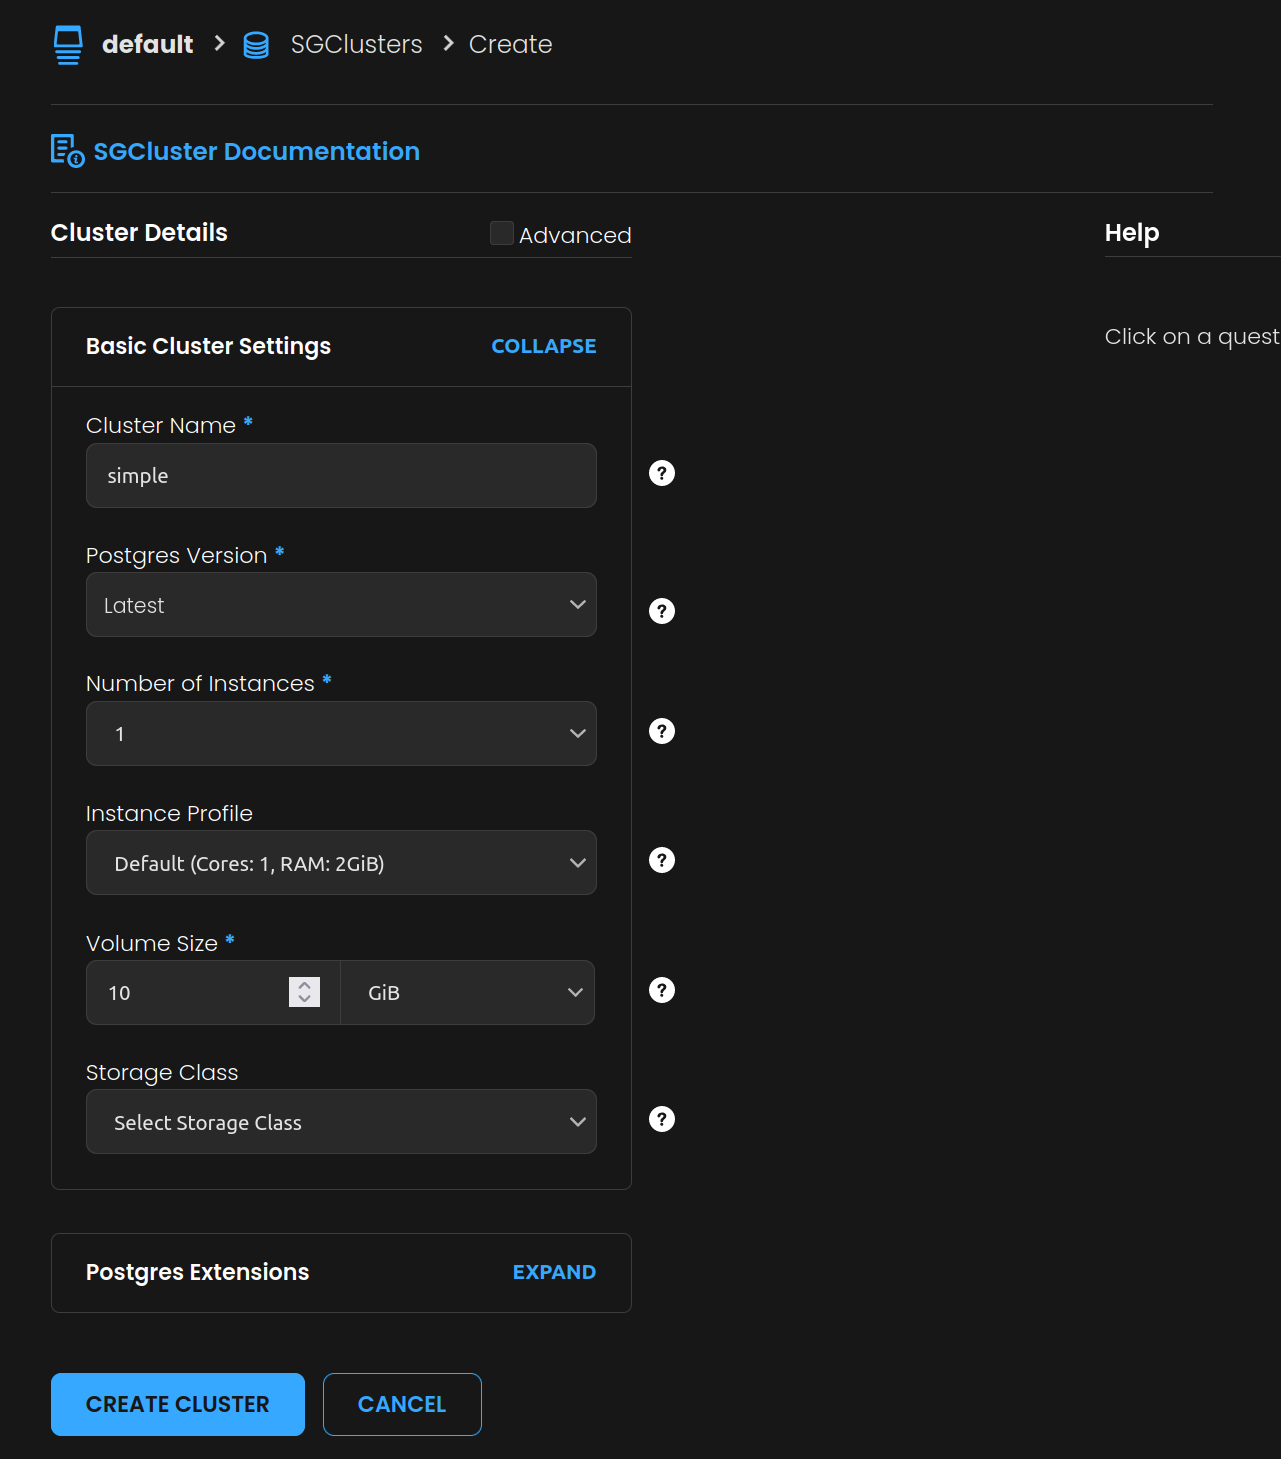
Select a namespace to work on (you may use default, or create one with kubectl create namespace demo). On the left
pane hover over StackGres Clusters and click on the (+) icon to create a new cluster. You may create a simple
cluster as in the following example:
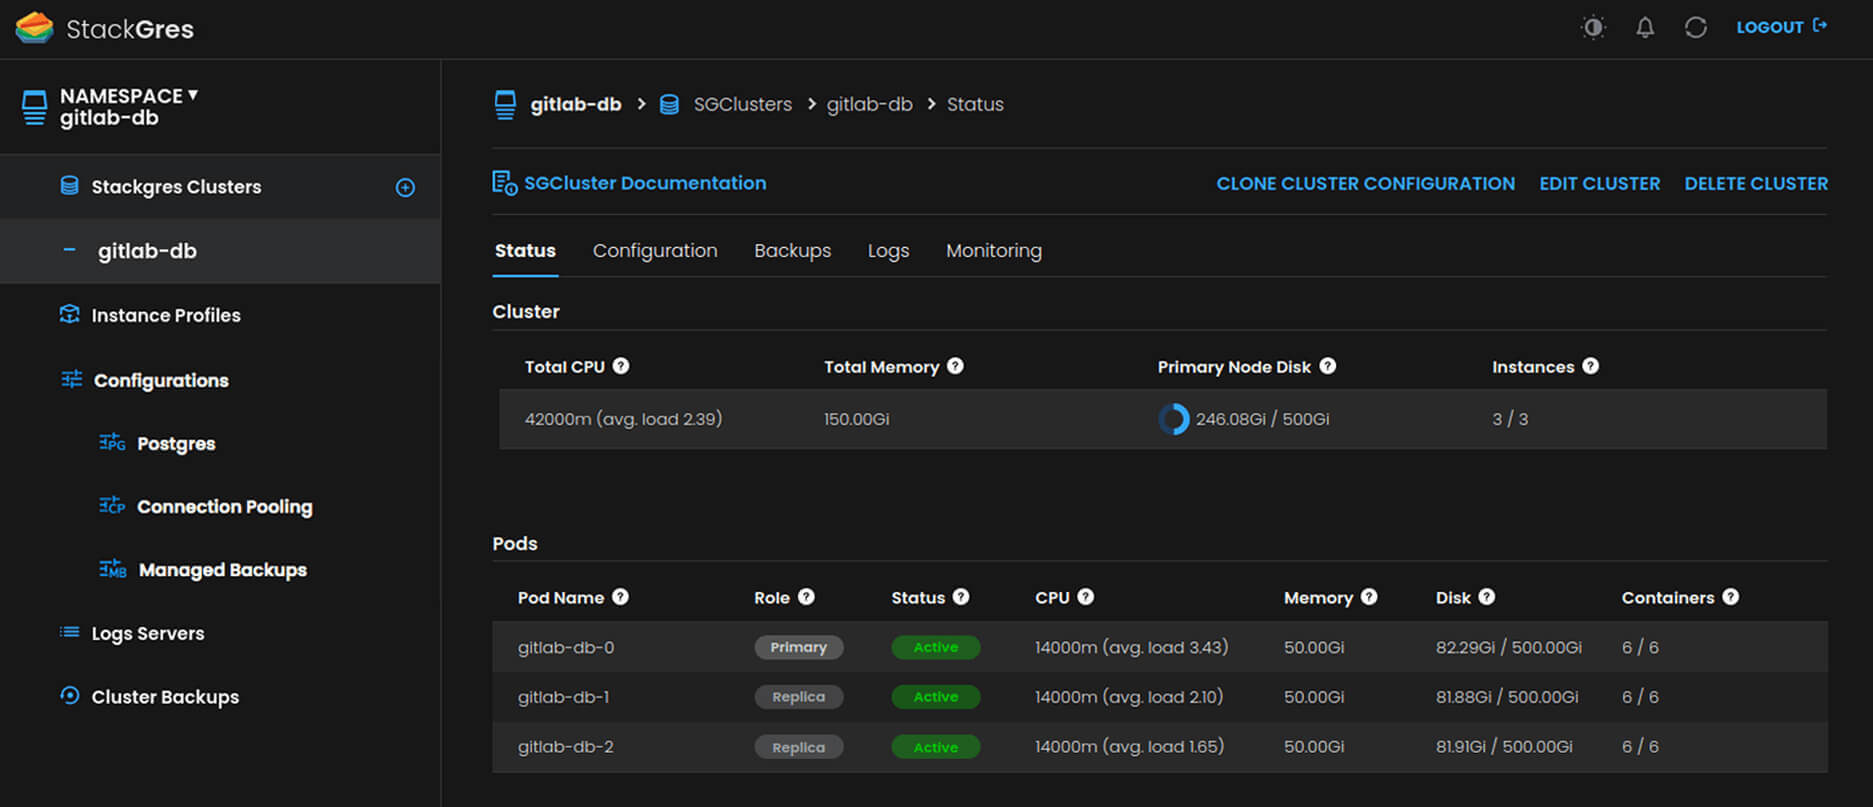
Once it is creating, you may click on the name to see the details about the cluster. Check the View Connection Info
link to the top right of the cluster information to see quick commands on how to connect to your new cluster.
Next steps: tutorial
Want to go deeper? Check our tutorial, which explores the main StackGres features in a little bit more detail.
Please drop us a note and let us know what you think in our Slack and/or Discord channels. Also write us there if you find any bug or want to become a collaborator.